Easy Step by Step to a 3d Box
You will often hear, that when drawing an object, you start out by breaking it down into its most basic shapes. These basic shapes usually consist of the square, the circle, the triangle and the rectangle. And if you lift these from a 2D perspective, to a 3D perspective, you get the box (or cube), the sphere, the cone and the cylinder. In this lesson I am going to show you how to draw boxes. The other shapes will follow in future lessons.
Pretty much anything you can think of, can be constructed using these four shapes, or a combination of them. So learning these, is a task well worth your time.
First of, let me show you what I mean by going from 2D to 3D.
As you can see in the drawing beneath, I have drawn a square, a circle, a triangle and a rectangle. 2 dimensional shapes, flat on the paper. Just below, I have then transferred these into 3 dimensional shapes, by adding and changing some lines. As you can see they have now obtained a roomy quality, and this way we get the box, the sphere, the cone and the cylinder.

I have tried to make them as stylistic as possible for the sake of this lesson, since what we're after here, is an understanding of the way the shapes are constructed. For this reason I have deliberately left out shading and shadows, which would greatly enhance the 3D effect and realism. (We'll get to that later). But even with this added simplicity, it's easy to see how the 3D shapes are so much more lively and engaging. This is (usually) what we're after when we draw, so it makes a lot of sense to practice these.
Practicing the Basics
In almost anything you can imagine, that takes some level of skill work, from calisthenics to playing an instrument, you'll hear people saying that practicing the basics is essential. It just makes everything else easier ! And this is no different for drawing. Boxes alone will teach you about line work, construction, perspective and dimensions, just to name a few benefits. They're the basis of numerous other objects, plus they're just a lot of fun on their own!
Many Approaches
First of all, you should know that there are numerous ways to draw boxes! I'm going to show you a couple of different ways to do it. I would recommend you play around with these approaches, to find your own preference.
Box variations 1 & 2 are very good starting points, though… Because in the way you draw these, you really get a sense of the way the box is constructed. This is great for understanding the 3D nature of the box, which will help you in many other aspects of drawing further down the road.
As always, when actually drawing, I would also recommend dra wing very lightly in the beginning, and adding more pressure as you find your lines.
So… Without further ado, here's how to draw boxes.
Box Variation 1
This box is viewed directly from the front, and therefore has two visible sides in the solid form.
Step one: Simply draw a square.
- If you're very new to drawing, don't get discouraged if this is harder than you think. Just take your time, and make it as accurate as possible. If you have to use a ruler, you can, but I would strongly encourage you to practice doing it without one.
- Remember to draw lightly as you'll be erasing some of the lines later.
Step Two: Draw another square, a bit smaller, a bit higher and "behind" the first one.
- For the sake of clarity in the lesson, I have drawn this second square very lightly. You don't have to do this.
- Notice how the distance between the bottom two lines is bigger than the top two lines. It's supposed to be like that 😉 It's perspective, and it adds to the realism. (Look at my drawing further down the page, for an example of this)
Step Three: Now simply connect the corners, and voilà, you have a box!

Now that you have your box, you can decide how you want it to look. In the examples below, you can see how I erased certain lines to get a specific variation of the box. (Look at the small arrows for reference).
For this particular box, you basically have three options available:
- Open in front (erase the lines on the top)
- Open on top (erase the lines in the front)
- Solid box (yes, you guessed it… Erase the lines on top and in front)
And you can obviously play around with combining them. Or you could draw the whole thing upside down, so you get a view from the bottom instead, etc. etc. In fact, I highly encourage you to do stuff like that. Exploration is your friend! 😉

Box Variation 2
This box is viewed a bit from an angle, and therefore has three visible sides:
Step one: Draw a square. Angle it downwards a bit, (not too much).
Step Two: Draw another square, a bit higher, and a bit "behind" the first one.
Step Three: Connect the corners, and there it is!

For this box, you have three visible sides in front. This gives you four basic options (look at the picture below for reference).
- Open in front to the left (notice how you can see the back of the box here).
- Open in front to the right (slightly different angle, so you can't see the back in this one).
- Open on top
- Solid Box
And again: combine them and play around with them as you like. Adventure is your friend! 😉

Box Variation 3
This one is actually similar to variation 2, as you can see. It is just a different way of drawing it.
Step One: Draw a Y
- Make sure that all three angles are greater than 90 degrees.
- You can play around with the length of the lines for different end results. A long line will obviously give a long box.
Step Two: Complete one side of the box, by drawing the two opposing sides to make a square.
- Notice how I slanted them inwards a little bit. This gives a sense of perspective, which adds some nice "character" to the box. You can actually do it a lot more than what I have done here. (Look at my drawing further down, to get an example of perspective and boxes of different shapes).
Step Three: Simply Repeat step two for the other two sides.
Obviously all the same options for a solid box or open sides, apply here. But instead of erasing, you will have to add the appropriate lines. Look at the options for Box Variation 2 for reference (the picture above).

Here is a drawing I did, that I think shows the power of perspective quite nicely.

Box Variation 4
As the keen observer will notice, this next one is quite similar to variations 2 and 3. Just an alternative way of drawing it.
Step One: Draw a rhombus (also known as the diamond shape)
Step Two: Add three lines in a downwards direction
- If you draw the middle one longer than the other two, you get a sense of proportion similar to variation three above
Step Three: Add the bottom lines, to finish your masterpiece!
 And again: all the same options for a solid box or open sides apply here. But instead of erasing, you will have to add the appropriate lines. Look at the options for Box Variation 2 for reference (four pictures above).
Some people find it easier to start with one of the sides instead of the top. If this is you, that is just fine and dandy! I do it some times as well. It just depends on what the situation is. The exact same approach still applies. You just draw the next three lines coming out to the side instead. Again I absolutely encourage you to play around with the different approaches and variations! Combine them, change them, make them your own! Anarchy is your friend! 😉
So There You Have it!
That's basically how to draw boxes…
Play around with the different methods, and find your preferred one. I would, however, recommend that you work with them all. As you'll probably notice, different approaches fit different situations, and then it's nice to be able to adjust accordingly.
Drawing boxes really is one of the most fundamental skills in drawing, and one that you should practice extensively. I t will greatly enhance your drawing skills, and help you with a ton of other aspects of drawing. Trust me!
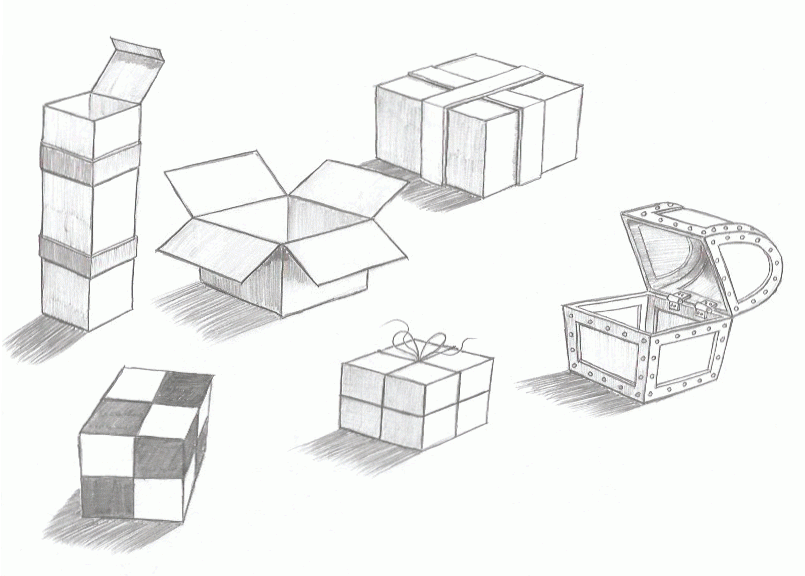
Once you get the hang of the basic boxes, the next logical step is to expand upon them a bit, and make them into something more tangible. Start with the basic box as I have shown you, and build from there. Make it as complex or as simple as you like.
Take a look at this drawing for some very simple beginning ideas.
Yes…I have said it before, and I'll say it again and again: You can never draw too many boxes!
-Just remember to also think outside them, once in a while…! 😉
Thanks for checking out my stuff, and until the next lesson: Best wishes, and happy (box) drawing!
Michael
Source: https://thedrawingjourney.com/beginner-drawing-lessons-how-to-draw-boxes
0 Response to "Easy Step by Step to a 3d Box"
Post a Comment